
We recently had a lovely few days at our bush block where it did nothing but rain, so I cowered under shelter and did a bit of natural dyeing. Whilst I was at it, I learned a few lessons that I thought I’d share.
A few weeks ago I mordanted some cotton knit with soy milk. Some of my research suggested that the fabric could be left for a long time, but other research said that after two weeks the soy milk became a kind of anti-mordant where it stopped the fabric taking up the colour. The idea with cotton is to get some protein into the fibres, so I ground up soaked soy beans and made the milk and soaked my fabric for a couple of days (I can’t face letting it get slimy) and let it dry. I still had soy milk powder on the fabric when I dyed it a few weeks later.

I think it’s clear that soy milk mordant is not brilliant – my string took the colour better than the knit. I was pretty disappointed and suspect that it does impede the takeup of colour.
I had also read that lichen is an excellent dye material and it’s substantive which means that no mordant is needed. My sort of material! Now I have to tell you that our holiday place is an internet black hole so I couldn’t do any research whilst we were there, and I’m not very good at distinguishing between moss and lichen. So I merrily gathered from fallen tree branches and stuck the material in a pot with water and set it off to boil. 
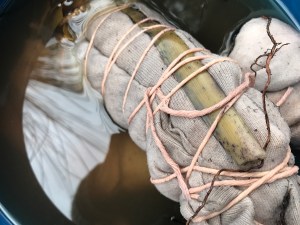
I added my fabric bundles (the failed ones from the day before) and simmered away. I had rolled eucalyptus leaves, wattle stems and flowers and basically anything else that took my fancy into the fabric. I can tell you now that this whole approach was completely wrong. Lichen has to be soaked in ammonia to get the colour and then the fabric gets immersed. I shall repeat the experiment and write a little tutorial as I go. The only imprimatur, if I can use the term loosely, is that the lichen be harvested from windfall branches and tree trunks as it takes a long, long time to grow.
I had also been reading about iron blankets, so I made one from an old pillow case. All I did was soak some rusty iron bits in a 50/50 mix of vinegar and water for a week or so and then add the pillow case to the jar. At some point in the lichen dye process I decided that I wasn’t getting any sort of colour so wrapped the fabric into the iron blanket for 10 minutes. Immediate colour was detected.
I washed the fabric really well when I got home and set about making it up. I had several pieces and figured I could get at least a couple of things from them. First up is a lovely 100% cotton knit with a most luxuriant feel that I found in an op shop for a dollar at some point.

I decided that I just about had enough to make a long sleeved t-shirt and put my t-shirt block on the fabric. I widened out the bodice side seams a bit so it wouldn’t be as fitted. The result is shown in the featured image and the back view below.

This was a piece of fabric that is manufactured in a loop, so the dye is stronger on one side than the other, but I really like the muted, subtle design. A close up shows some of the leaf detail. I need to say here that this is a pretty poor showing compared with much of the work I’ve seen from other people, but baby steps for me in this.

I also made a top from a pattern given to us by our teacher at the Fibres West Retreat. Aukje Boonstra created this pattern when she was at a bushcamp and it’s known as the “Bushcamp pinafore”. She gave us all the pattern and I thought it would be really appropriate for this piece of knit fabric. A close up of some of the detail, which I was quite pleased with.

This piece of knit looked as though it had been dragged across the floor and was covered in some sort of yellow stains. I scoured it and it came completely clean. I had cut it up to make something else which didn’t eventuate, so it was dyed in three parts.
A bit of learning happened with these pieces of fabric. I went all gung ho and added nuts and sticks and all sorts of things, with the result that the knit got bent out of shape and I had little lumps and bumps all over it. Next time I shall only use flat things with my knits.

They are slowly falling out but the top still looks a bit wrinkled and untidy. I added a pocket using a piece of scrap. Knits are also really difficult to wrap tightly as they stretch. In a future post I shall show you a top made from an old pillowcase and the patterning is much more defined as I could hold the fabric really taut as I wrapped it.
You will notice that the eucalyptus left some orange/brown marks on this piece, and I obviously left my new favourite Jalie pull on jeans on when I was playing because I’ve managed to get stains on the bottom of them. Another lesson learned there!

The back is my favourite part of this top. You can see that I had to cobble two small pieces of fabric together, but these two pieces got the lion’s share of the dye. 
There is some gorgeous detail here! One of the other things that I had missed is that it is better to collect leaf material in the summer or dry weather. I collected all mine during some pretty steady rain. This meant that there was more water in the material and is probably another reason why I didn’t get a lot of any colour. 
These two pieces are my entry for the Make a Garment a Month (MAGAM) challenge, and this month’s theme is “Artwear August”. I feel as though these might be sufficiently arty. If not the garments, then the Bushcamp pinafore reminds me of an art smock, so I should be ok on all counts!! A quick note here that all natural dyes in these garments were derived from plants that we have round our campsite on our bush block and I used rainwater that we collect in a rainwater tank.
That’s some very cool dyeing. Love it! I had registered for a one-day class in natural dyes, but it was cancelled because not enough people signed up. Boo.
Oh, such a shame.
I thought of you today when I saw a book in boffins called ‘Natural Colour’ by Sasha Duerr (I think that’s right). I was rushed so couldn’t read it properly, but it looked like it could be good. The dyeing is definitely coming along. I would love to be able to make leaf-printed fabric
I’ve got that book! And every other book. Doesn’t seem to help. Maybe we need a dyeing session?
Did the rusty screws give you that ,ovely purply blue colour? Like you I love the back. I think using the fwo pieces is an improvement to the original design. Well done.
Thank you. Yes, the rusty stuff creates iron acetate which I like much more than using powdered iron. I have a lot to learn!
I’m finding all of this just fascinating. I live in Brisbane and I’ve not been able to find any classes to learn this skill. Is there a good beginners book you would recommend?
Judith Hallett has published a really good book and it’s Australian. It’s called Natural Plant Dyes. email me (sstoney@mac.com) and I’ll tell you how to get a copy. Most books only talk about wool, which is a pain. The internet is a great source of info of course, and there are a couple of good Facebook groups – Printing Botanicals and Eco-dye-print-create.
It’s always a surprise to see what comes out of the cooking pot. I was wondering will there ever becoming a day that you can control the process? Or will it always be a surprise.
I’m so unscientific Sonja, that it will always be a surprise to me!!
These look super arty! And sooo beautiful! I wouldn’t have guessed that such a nice print would come out of such a disgusting looking pot 😀 Thanks so much for sharing your progress! 🙂
Lol! It was so disgusting! I really like the subtle print and hope it doesn’t wash out.
Great to see the creative dyes Sue. I have totally been hard at it – I will post a pick at some point of what I habe named my game of thrones top. I cut up an old nineties jumper and dyed the hell out of it…then stiched and added a felted slash…oh the look is “out there”. But I wear it all the time around the house & love it. I have a wattle dyed top in the pot awaiting it’s unveiling.
Ooh, I must see!!
Oh my! This sounds complicated! I’m glad I can follow along as you do it. The colour is subtle in some places and it’s so lovely that the “print” made is so unique! Lovely work!
Thanks Linda, I’m just in the process of dyeing with Rosemary, which is proving to be fascinating.
this is great! i need to try it out
Oh, you so do!
Your experiments with natural dyes is quite interesting but I will watch from the side lines.
Lol! That’s a safe place to be Sharon!
I think the dyeing is splendid, especially for a knit!