
I used to have a lovely ready-to-wear rain cape and then it did what they often do, which was to delaminate. All the waterproofing just shredded off and I was left with something that was quite useless.
Rain capes are more useful in some ways than a raincoat because they can keep a bag or backpack dry, so I decided that I would make my own and finished up with a rather unattractive but oh-so-functional cape.
I had certain requirements; a hood that stayed on in the wind and which didn’t droop over my face, I needed to be able to carry my bag under the cape, and it needed to be comfortable.
I finished up modifying Pattern H, the hooded cape, from the Japanese sewing book “Stylish Wraps” by Yoshiko Tsukiori.


I toiled my chosen cape and found that it was too short and only met in the middle at the neckline, so basically useless. I set about making the following modifications:
- I lengthened it by about 20cms – as much as my fabric would allow
- I added 10cm to the centre front, giving me an extra 20cms in the centre. I also added a rectangle at the top of the centre front so that I would have extra coverage for my neck.

- Due to fabric limitations the top part of the cape has a centre seam at centre front. This seems to have worked perfectly well. The lower front was cut on the fold
- I added flaps to the arm slits to make them waterproof when my arms are inside the cape, but give a bit of extra coverage when they are outside.

- I added little triangles over the inside edges of the arm slits to help relieve some of the pressure when I’m putting my arms in and out as I noticed the stitching kept coming undone. These were added later and aren’t my best work as it was awkward to attach them
- I added tabs with metal press studs at the neckline so that I could wear the cape loose around the neck when the hood is down but stop water dripping down my front when it’s raining. The tabs also help keep the hood on my head, even in high winds

- I modified the hood by extending the front and adding a sheet of mylar. This forms a peak to stop the hood drooping down in front of my face, which is something I hate. I also self lined the hood.

- I added elastic in a casing into the sides of the hood to hold it close to my face
- I am considering adding an elasticated casing to the back of the hood to hold it close to the back of my head.
Quite a lot of changes. I had bought 2 metres of “water resistant oilcloth – dark nori” at The Remnant Warehouse. I was a bit worried that water resistant might not be good enough, but I’ve been out in fairly stormy weather in it and I’ve stayed perfectly dry underneath it. My legs and feet were another matter however…
The cape folds up to nothing and is light enough to keep in my bag. I have had thoughts of adding a pocket that it can be stuffed into.
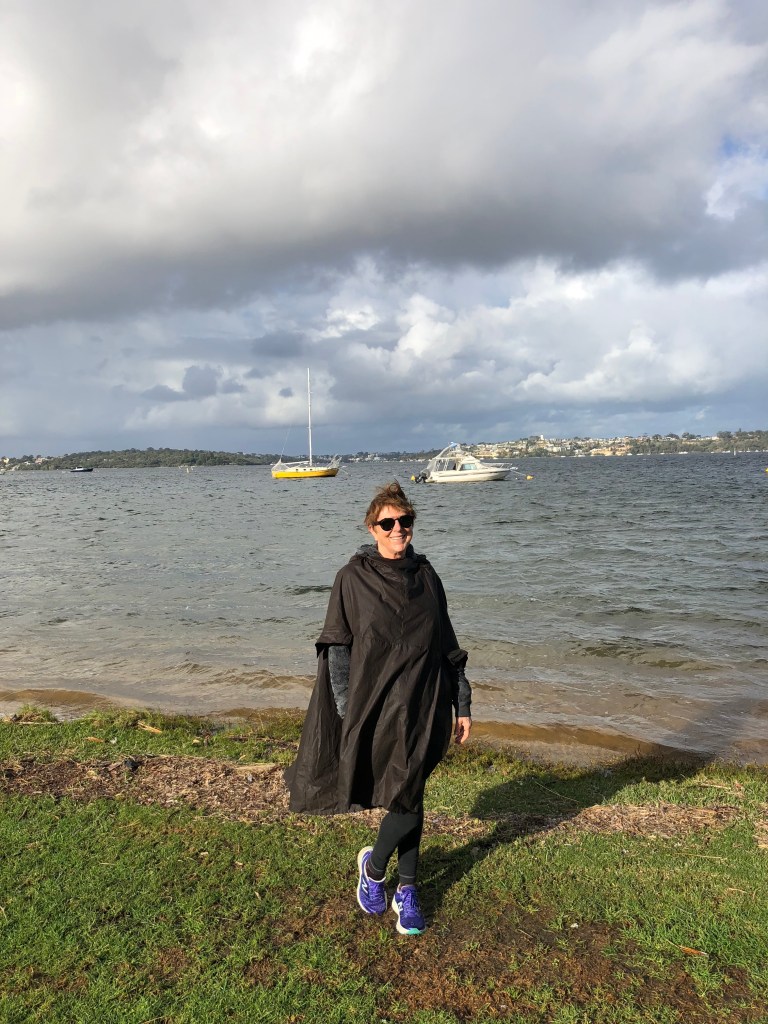
The cape has already proved its worth. I can tuck it in my bag when we go on our daily walks and whip it out at the first hint of rain. These photos were taken on one of our weird winter days where it was really windy with showers but sufficient sunshine to require sunglasses. The cape is certainly big enough to protect any of the bags that I might be carrying. On our walk it’s a small cross body bag, but I’ve worn it shopping with a much larger bag underneath.
This photo highlights the need for a bit of elastic at the back of the hood. I’ll get to it!

I am fairly well encased. I would like a slightly longer version but worry that it will get tangled in my legs.

The piece of mylar in the hood works brilliantly for keeping it off my face. It wasn’t wet enough or cold enough here to do up the tabs, but they do work well.
I found a beautiful passionfruit on a verge on our way to the river and spent the whole walk tossing it around. I then went home and had it for breakfast!
This was a really straightforward make once I’d worked out all my changes. It was really useful to have the toile to fiddle with. I just kept adding bits until I had pretty much the perfect cape.
I haven’t ordered from the Remnant Warehouse before, but they were fast and the fabric is exactly what I wanted. It was interesting to sew with it – I had constantly oily hands.
I have a beautiful piece of Merchant & Mills mustard oilcloth bought from My Fabricology, which I was going to make up in this pattern for this winter, but it might be a next winter version.
That‘s a very useful garment and it isn‘t unattractive at all. I love how you have made all those changes to achieve the best results for your needs. I wonder that oilcloth can be so flexible to fold it down, I thought it was bulky. You have the best ideas!
This is a fairly lightweight oilcloth and it folds into a tiny bundle. It’s a really useful garment.
Now I need a cape! What a fun project and so practical 🙂 Thank you for summing up all your modifications, seems like you have really thought this cape through!
Thank you. I did, for once, think about what I was doing! A cape is really handy for hiking, you would love it!
Excellent idea, and very well executed. I can see how everyone needs one of those 😉.
So handy!
Such a great and functional make. Just something to keep in mind towards the typical Dutch Autumn weather.
It’s also fantastic on a bicycle, Sonja!
Well Summer will be over soon here and Autumn always comes with rain. I keep it in mind.
I think your cape looks really attractive, and so useful in this crazy wild weather we’ve been having! I love the you can fit your bag under it nicely 🙂
Thank you Carolyn, being able to keep my bag dry was a bit of a challenge and the cape is the perfect way of doing it!
Puxa vida devo agradecer vocês ganharam meu dia que site fantástico cheio de noticias não me canso de Elogiar já é a minha terceira visita por aqui absolutamente fantástico.
Gir Leiteiro
Thank you!