
I am not really a fickle person but I am throwing over my Jalie Éléonore pull on jeans in favour of the Itch-to-Stitch Mountain View pull on jeans – for the moment!
You might ask why, and it’s a good question as they have a lot of similarities. The description of the Mountain View pull on jeans includes the following:
- Slightly high mid-rise
- Wide waistband for some tummy control
- Straight cut legs (with instructions on making slim legs)
- Four pockets
- Seam along back legs for greater shaping
- Faux fly with topstitching
- Layers feature (print only the sizes you need)
I was seduced by the higher mid-rise and the straight cut legs, and I always love the layers feature. I also decided that the back seam would allow me to refine the fit at the back, and I look forward to playing with this feature now that I’ve made the jeans and can see what I can do.

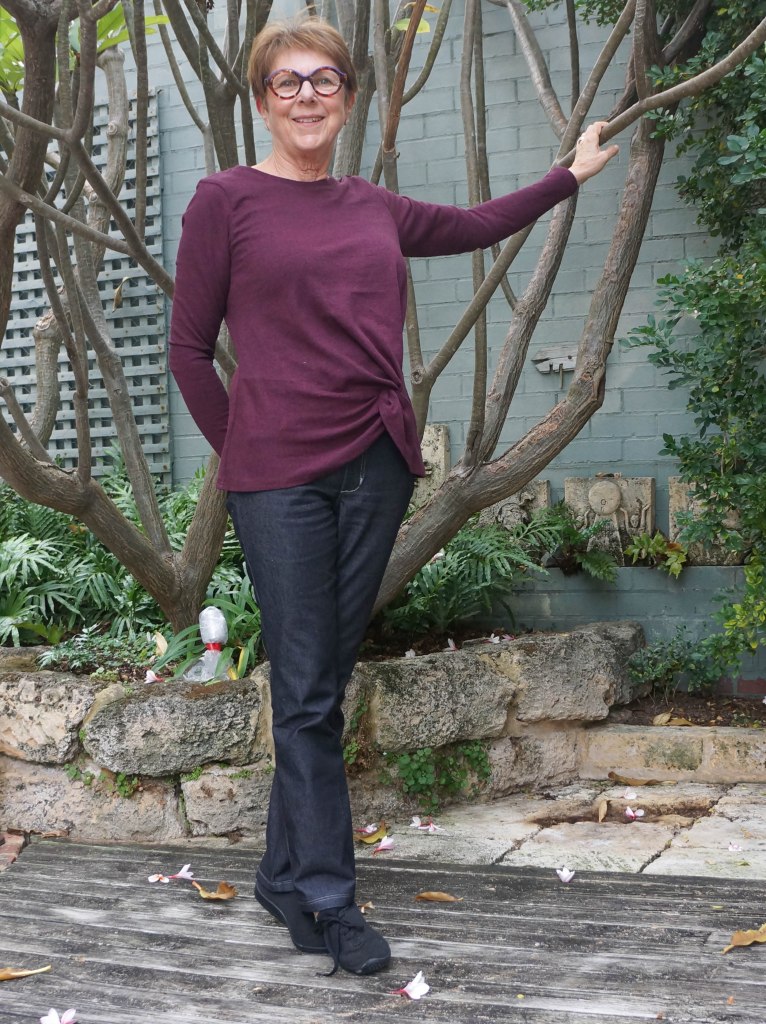
This is my first pair, with no tweaks, apart from sizing down two sizes between my waist and hips. The fit is ok, but I know that I can get them better than this. I first posted these jeans when I blogged my Itch-to-Stitch Nottingham top and they are a bit of a heavenly match.
In the instructions the pockets are almost the last things to be added to the jeans, which I found rather odd. I therefore added mine after I put the two back pieces together, when they were flat. This made more sense to me, but, yes, you guessed it, the pockets looked like they were sliding down my legs, so needed to be raised by 4cm. The delay in adding the pockets means that the placement can be sensibly determined, but also means that the back seam can be tweaked once the jeans are together, so I missed that opportunity too.
It’s hard to see, but I get weird bubbles of fabric on my inner thighs in most trousers and these jeans are no exception. The photo below just shows it on the right inner thigh.

I also get a bit of bagginess on the outside lower hip. This could be eliminated by grading down even more, and I may do that next time.

Now that we are, ahem, examining my derriere, did you notice the bird on my pocket? I do not usually embellish my pockets, but when I saw what Crystal from Sewing Vortex did with the pockets on her Danube skirt, I decided I had to do something similar – thanks Crystal!
I drew out this very simple bird (inspiration came from a tattoo website) on to some tear away and, using the BSR foot on my machine, satin stitched round it with variegated thread.

The BSR stands for Bernina Stitch Regulator and it is a foot that makes the stitch an even length irrespective of speed but I found it really difficult to control because the feed dogs have to be dropped. However, I am rather pleased with my bird. It looks a little rough round the edges as I’ve only torn away the tearaway. I am expecting it to smooth out when I wash the jeans and the rest dissolves, and my chalk marks wash off.

My pocket topstitching looks a little tatty because of course, I had to unpick them and reattach.
A note on the topstitching. When I was in Montréal, my friend Hélène gave me a packet of double eyed sewing machine needles. Neither of us had ever seen these before. I decided that I wanted to use them on these jeans, so threaded them up and away I went. It was only when I began writing this post that I googled them and learned some interesting facts:
“Schmetz Double Eye Sewing Machine Needles for Decorative Sewing & Basting
You may recall these needles from many years ago. They were called “Magic Needles” or “Basting Needles”. They have two eyes, one above the other on one shank. Originally used for machine basting, they had disappeared for quite some time, and have now been re-discovered for decorative stitching! Size 80 only.
To use for machine basting:
- Thread the top eye only. Set your machine for a wide zig zag stitch, and the longest stitch length possible. Also reduce your upper thread tension. The sewing hook will catch the thread on the right needle swing and skip a stitch on the left needle swing, producing a basting stitch twice as long as your machine’s stitch length! Twice as easy to remove!
For decorative stitching:
- Pass one thread through the top eye, one thread through the bottom eye. You will need to use a stitch width of about one half of your maximum stitch width. You will also need to move your needle position to the far right so that your decorative stitch is stitching along the right hand side of the presser foot opening. If the thread in the upper eye is skipping on the left side, you need to reduce your stitch width further. A little experimenting will produce some really interesting results!”
How interesting is the basting tip? I’m definitely going to try that. I thought I would try the topstitching method for my next pair of jeans but used my old Bernina 830 for the topstitching and it did not like the needle at all. I reverted to cordonette in the end.
The second pair of jeans is from a stretchier denim and this does make a difference. I tried tweaking the back, but I still don’t have a good fit so I might need to convert this pattern to my jeans block which will alter the crotch curve. I did concentrate on embroidering those back pockets though and here is a little montage of the process. Both pockets are shown here.

This time I just stuck that picture under the needle and used a regular foot. The only thing I did was adjust the stitch width as I went round to get the thick and thin elements. I didn’t do such a good job with the ears and I think squinting is necessary to work out that these are cats, but I am still pretty happy with them.

This photo shows that I haven’t got the fit of the back of the legs correct yet, but I will work on it. I am going to take in that side seam at the hip a bit more to try and eliminate a couple of the wrinkles there and I might take a wedge out of the inner thigh. It’s always tricky with jeans to make adjustments after the fact because of the topstitching, but I think I can work round it a bit.
The front is pretty good, although you can see excess fabric here and there.

So a word or two on the pattern. As with all ITS patterns, it is beautifully drafted and has some nice design features. I was quite interested in comparing these with the Jalie Éléonore pull on jeans, and I think there are enough differences to make it worth while making these. The back seam and wider legs means that more fabric is required to make them, and I thought I would love the wide waist band, but, although it is really comfortable (especially at the back), I find that I am working hard to keep it covered – a longer top would resolve this of course! The photo above shows what I mean. I really like the front pockets and they are big enough to be actually useful. I was concerned that the back seam might increase the potential for twisting in the legs, and I was very careful with this.
In summary, I know I will wear these jeans a lot, but may feel minor irritation about the fit. I am pleased that I have (almost) perfected a method for embellishing the pockets, and I look forward to going mad with this technique!
Thank you for this thorough review! I have been very interested in this pattern, but yours are not the only ones I’ve seen that have an issue with excess fabric in the back. Which made me wonder, are the front and back inseams the same length? I’ve been working on the fit of my Ginger jeans pattern, which has the back inseam drafted shorter, and then you ease the front into the back between crotch and knee. I firgit to do this once while baste-fitting and got the same kind of bagginess, but when I sewed them together properly it went away. The front on the second pair is spot-on and I love your decorative pockets!
Yes, it used to be really common to have the inseams a different length but this seems to have been eliminated from modern patterns. I might redraft these trousers. Thanks for liking my pockets!
Very interesting post and I will be watching with interest how you remove that pleat of fabric from the in seam.
I’ll be watching with interest too!!
Thanks for reminding me about the existence of this special sewing needle we bought together in Montréal. I had completely forgotten about it! I thought their purpose was just to merge two thread colours together, but there is more to it – thanks for your research! Your new pull-on jeans look great with pocket embellishments, and these abstract cats!
I wondered if you’d used yours and I thought it was about merging thread too, so the basting thing was quite interesting. I am very impressed with my cats!
Thank you for this detailed review of the Mountain View jeans which I found very interesting as I have similar fit issues as yourself. Interesting info about the double needle. I shall have to look out for some of those. I am sure you are going to get a lot of wear out of your new jeans.
Thanks Christine. If I resolve the fit I’ll do a post on the method.
If you cut the back pattern a size smaller than the front might that make a better fit?
Now that is a very interesting suggestion! I think I might give it a try!
There are some interesting design features on this pattern, and I really like your decorated pockets.
I’m going to have to look for the needles you described now – they sound very interesting!
I haven’t seen the needles in the shops here, but I’m sure they are around. I have seen them online.
Beautiful embroidery on the pockets. Jeans are always a great opportunity to get creative with the topstitching and pocket design. Every pair you make is lovelier than the last!
Thanks Linda. I am really enjoying the embroidery. This won’t be the last of it!
What great embellishments!:) Making them mist have been fun! I always find topstitching so satisfying 😀 The fit is good and I’m sure you will be able to get the next jeans to fit perfectly 🙂
I might take the second pair apart – shame I riveted the pockets but I think I can get round that! I enjoy topstitching too but don’t find it relaxing.
These are both good looking pairs of jeans and think the embroidery motifs are the best! Interesting the differences you found between these and the Eleonores. As always Sue, you are ever inspiring!! 🙂
Thanks Lisa. All I want to do now is embroider back pockets!
Your jeans look great, Sue!
Thanks Carolyn. I am liking the looser fit in the legs, but not so much around the hips. Unpicking about to commence!