Welcome to the Japanese knot bag sewalong, hosted by me on behalf of the Sewalongs and Sewing Contests group on Facebook. You do not need to be a member of this Facebook group to join the sewalong, anyone can join in. However, thanks to our wonderful sponsors we have a prize consisting of 2 pdf patterns from Sew Sweetness and 2 pdf patterns from Chris W Designs, and to be eligible for the prize you have to become a member of this group and post pictures of your completed bag by the last day of November. So join now!
For November’s sewalong we are going to make a simple Japanese knot bag, which looks like this.
The pattern is available here: Knot bag_A3 (for printing on A3 paper) or knot bag_A4 (for printing on A4 paper and taping together). Please note that these are my patterns and I don’t have access to Illustrator so they are dodgily hand drawn. I also haven’t provided a test square as it doesn’t matter if your bag is scaled up or down, just check that you are happy with the size. I’m sorry for the quality of the drawing, but once you cut out the pattern and start sewing, all should be good!
[Update: I have been reminded that some parts of the world don’t use A4 and A3 sizing, so here are the sizes for you:
A3 Paper Size measures 297mm (width) x 420mm (height) or 29.7cm x 42cm or 11.7inches x 16.5inches.
A4 Paper Size measures 210mm (width) x 297mm (height) or 21cm x 29.7cm or 11.7inches x 8.3inches.
US Letter and the size that is twice that should do as well. Thank you to Barbara for reminding me of this oversight]
These bags are designed to be worn over your wrist. They dangle, and are really good for shopping as both hands are free. They are also wonderful at cocktail parties or other standup events where you have to eat and drink, as you will have both hands free and won’t be trying to keep that clutch under your arm, or a bag over your shoulder. They are small and can take your phone, keys, credit card/money. They do not take the usual contents of a regular handbag/purse. They are also secure as the design means that they are always firmly closed.
Timetable
The timetable for the sewalong is as follows:
November 1 – 4: Decide what you would like your bag to look like. Pattern printing and preparation. Gathering your materials
November 5 – 9: Cutting out your bag and sewing it together.
November 10 – 15: Ideas for different bags.
You will have plenty of time in here to make another bag, or change it a bit. Don’t panic if you get behind the schedule, I’ve collapsed it a bit so that you can see what you need to do ahead of time.
November 30: Send me your photos or links to your blogs so that I can do a roundup of all the wonderful bags! We also need to have your entry for the prize draw.
So, let’s start
First you need to decide whether you are making a day or evening bag, and choose your materials accordingly. The pattern is for a mid-sized bag – You can make it bigger or smaller by scaling it. I think smaller ones look better for the evening, but that’s just my opinion.
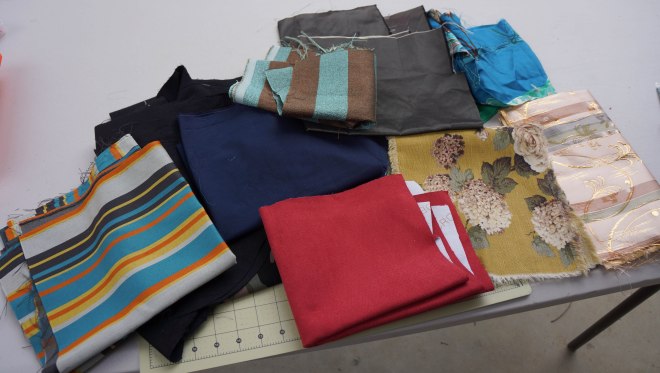
Next you need to consider suitable fabrics. Here is a little sample of suitable fabrics from my stash:
For the outside:
- Home decor fabric (as in my example photo)
- lightweight canvas
- cotton twill
- quilting cotton
- leather/pleather
- corduroy
- wool tweed/any tightly woven woollen fabric
- heavy silk or satin is good for evening bags
- old cushion covers make good bags
- that piece of tapestry you have no idea what to do with
- you can also quilt some fabric
- you might want to make one from patchwork
- leftover scraps are particularly useful
- I have made a bag from knit fabric but didn’t consider it a success. Your choice.
Here is an example of a leather bag, which works pretty well, but choose soft, pliable leather/pleather.

For the lining:
- silk
- polyester
- cotton
- any leftover fabric from previous makes.
- If your fabric is really lightweight, interface it.
Consider making your bag reversible. You could have cotton on one side and silk on the other – taking you from day to evening!
Think about whether you want to embellish your bag. For evening, you can interface some silk chiffons and stitch them together with metallic thread (use a metallic needle for this), and then sew them on to the outside of the bag. This one looks a bit tatty because I’ve been using it, but it gives you the idea. I’ve also used some fancy ribbon and braid from out of my stash – truly, anything goes with these bags!

You could embroider something on the bag, use some appliqué or beading, or use some of the fancy stitches on your machine. Sashiko would work well and I am considering one of these.
I have also pleated some fabric and sewn it on to the outside.

Do you want a pocket on the inside or the outside? Now is the time to decide. If you do want a pocket, trace a basic rectangle, cut it out of your fabric and hem the sides. Here is one made by one of my lovely followers, Hélène, who did the pattern testing for me. She made her bag from a winter weight fabric and I love the tartan trim on her pocket!

Pattern printing and preparation:
I have included two files: one is for printing on A4 paper and the pattern will need to be taped together in the usual way, by matching the numbers and the triangles. The second one is for printing on A3 paper and requires no matching and taping!
Once you have printed the pattern, you can either trace it off using your usual tracing medium, or cut it out and use the printed paper pattern.
Just in case you still need some motivation, here is an action shot of Hélène with her bag. She tested my pattern for me a while ago – it was clearly snowing! Helene also made her handle longer.
 a
a
I have provided a cross grain on the pattern in case you wish to cut your bag out on the bias, perhaps to make a cool pattern with some checked or striped fabric. A disclaimer: I’ve never done this, only wanted to!
OK, you have a few days to get planning, print out the pattern, and perhaps start some embellishment if that’s what you want to do.
Thank you Sue, this bag will be perfect for my date nights so I now need to work out what my fabric will be.
How wonderful, Sharon. That’s what I use mine for too!
I’ve been looking forward to this, and now it’s November already. Count me in!
Yay! Can’t wait to see what you make.
Oh, this is lovely, such a cute and unique design! Thanks for the great instructions!
Thank you!
Hey Sue! Thanks for your nice words. This is a wonderful little bag, very versatile with a clever design. Your pattern was easy to understand and the PDF pieces got together nicely. Now I would love to try it in a nice soft leather.
Thank you for the lovely testimonial, Hélène, I’m so glad you like it!
This looks like it would make a fabulous Christmas present. I live in Canada and do not know what A3 and A4 paper means. Could you please give the paper sides in inches (e.g 8.5″ x 11″). Many thanks
Oh good point Barbara! If you use US letter and double whatever that is, you should be fine. I will measure my paper and amend my post.
Yup. I printed it off on regular old 8.5×11 inch paper without thinking and it printed just fine. Bigger than I expected.
You can make it smaller if you want to.
I made one to go with a tea dress , but I made it too complicated, I much prefer your pattern Sue 🙂
I did think about this when I read your post and wondered if you would try again. I hope you do!
Planning to Sue 🙂
This is so cute! I think I’m going to have to try it! Definitely put it on the old brain list…
Hello, Christmas Gifties!
Yes, they will make wonderful Christmas presents!
Pattern printed and ready to go!
Count me in 🙂 I´ll make it big enough to hold 2 nappies and a small pack of wet towels more so it will be perfect for going out with my daughter :))))
What a wonderful idea. I can’t wait to see it!
The A4 version prints well on Letter sized paper – I left shrink to fit as unchecked. You might update your opening paragraph so you don’t scare away North Americans.
Will do Heather. Thank you for letting me know.
I agree that this will make a great Christmas gift. Sadly, I am going to be delivering most of mine to family in Northumberland this weekend so they will have to be posted later. Thanks for the pattern – I will post my results eventually.
There is always next year…
What a great idea! I will have to hold off this year, but there is always next, right? I’m looking forward to reading along though!
Have taped and cut out the pattern. Have found lovely upholstery tapestry fabric with butterflies. So I am eager to start
Sounds lovely and I can’t wait to see it.